Monday 18 January 2016

Book Cover

First, I opened up a new document in photoshop and imported an illustration of cat eyes I had done in dip pen and watercolour into the document. I then began to add the different components of the front cover and centre-aligned it to give it more order and hierarchy as opposed to making everything different alignments which would look messy and not as effective. 


For the back cover, I added in the publishing logo for the book and a barcode and placed them so they were both centre aligned at the top and the bottom of the page. I made them bigger than I wanted them to be so that I could get a rough idea of how they would look on the page. 


Next, I imported one of my illustrations of the cat and moved the barcode, decreasing the size so that it wouldn't take attention away from the illustration. I also made the publishing logo smaller for the same reason. 


After doing this, I added in the blurb of the book and centre-aligned it so that there was more order and hierarchy within the composition. This then prompted me to increase the size of the illustration so that it catches the eye and moved elements of the design down a bit so that everything was in a closer proximity to each other, establishing the relationship between them all. I also increased the size of the barcode a little but kept it to the left side of the page.


Finally, I added both parts of the cover into a new photoshop document and added in the text I would need for the spine. I used the same typefaces as I did for the front cover to create consistency within the piece.
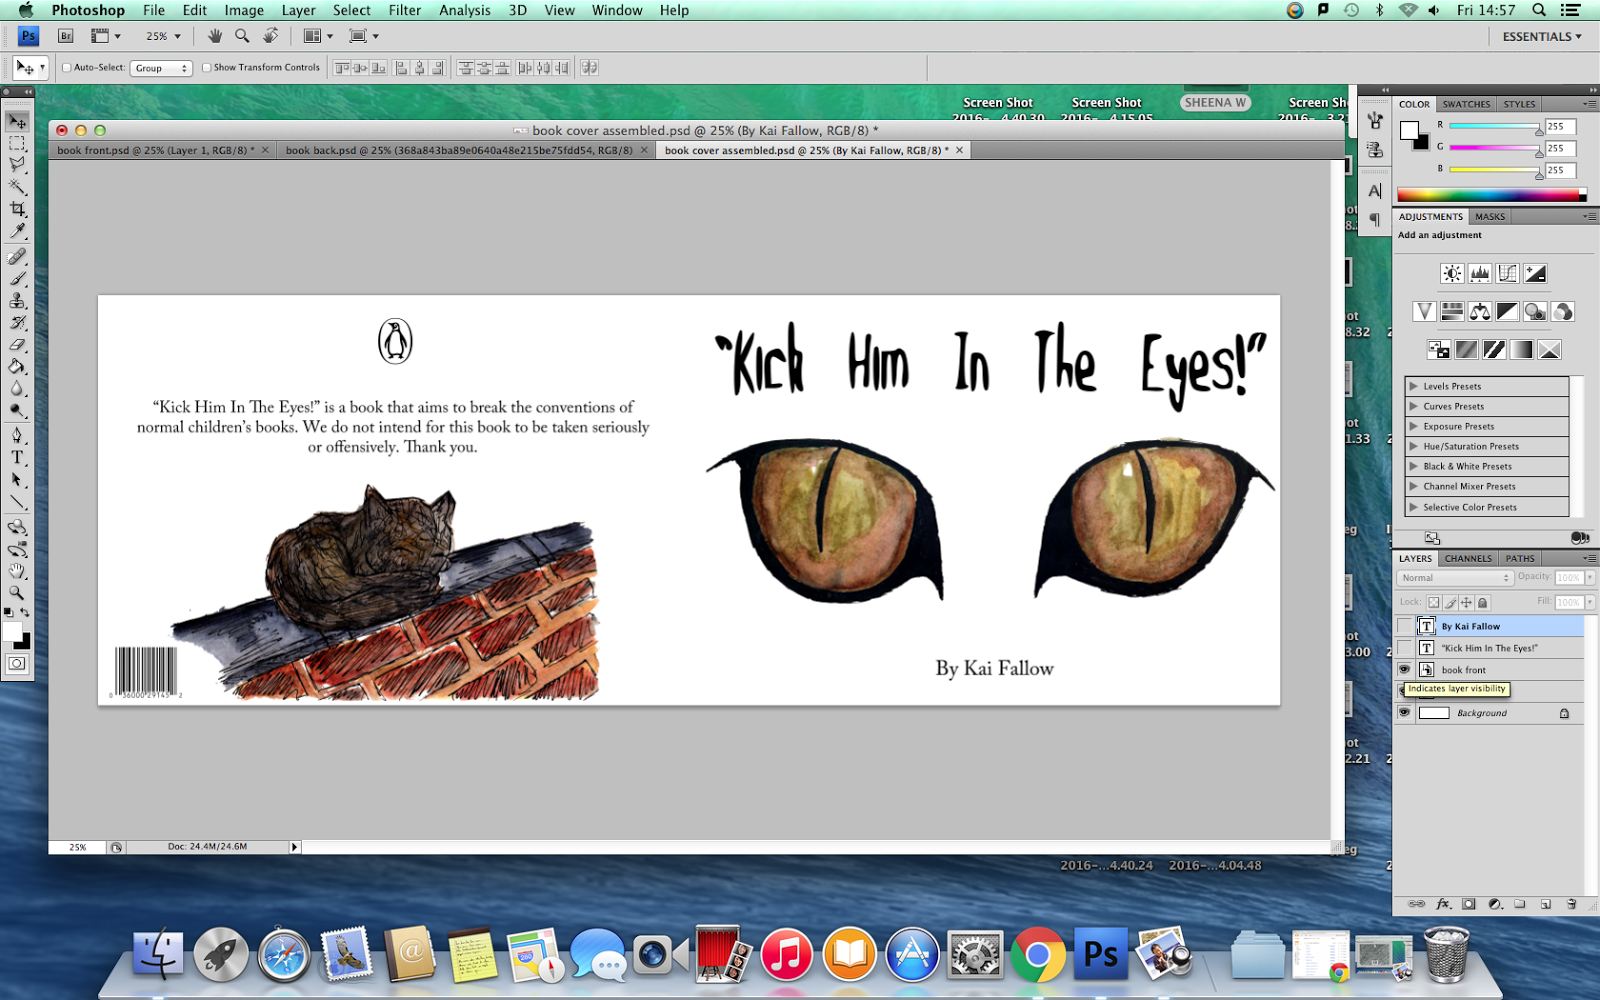


Final Result:


Tuesday 12 January 2016

Double Pages

Creating my double page spreads, I opened up four new photoshop documents and imported the illustration I would need for each page onto each one. I then also imported the body text for each page and changed the font to one of the typefaces I had made digitally. I made sure that the images were large and noticeable on the pages with the body text close by to indicate the relationship between illustration and narrative. 


Upon reviewing these pages, I decided that the typeface for the body text would have been more difficult to read and unsuitable for the font's purpose. As this is a narrative, I chose an old-style font that is far more legible than the one I had created as that one was more like a display type and not appropriate for a children's book. I then also moved and re-sized some of the illustrations as well as altering the positioning of the body text so that it was more organised and the illustrations would be easier to see as opposed to before.


I then proceeded to place the pages into new photoshop documents and arranged them so that they were laid out like double page spreads. When i did this, I noticed that some of the body text wasn't in line with the rest so I changed the positioning in order to make it look more organised and tidy.


Final Result:


Tuesday 15 December 2015

Colour Schemes

I already had in mind what colour schemes I wanted for different parts of the setting, so I used watercolour paint on some dip pen illustrations I had drawn of some locations in the book. I then used the same technique on the characters in the book as well as experimenting with different eye shapes and colours for the eyes that would go on the front cover of the book. After this, I proceeded to import the images into photoshop and edited the levels so that the colours and different tones stood out more.


Friday 11 December 2015

Adding Tone - My Process


First, I started off by drawing out the basic outlines of the illustrations I wanted to add tone to and I went over the pencil in black fine liner. I made these illustrations simplistic and avoided using great amounts of tone as I wanted to experiment with this in photoshop. 


My next step was to import both pages into photoshop and then use the threshold tool to make the lines crisper as well as making the grey of the paper more white. After doing this, I used the magic wand tool to select the white background and delete it so that I could insert a white background on a different layer. 


To make the bush look messier and give it a rougher quality, I changed the qualities of the paintbrush so that it had more of a texture rather than being smooth. I also added a wet edge effect to the brush so that it would be easier to add tone by using the brush on the same areas of the layer over and over. This enabled me to add darker tones easier whilst keeping the quality of the brush.


I then proceeded to apply the brush to the whole illustration so that I could experiment with making different elements of the images darker whilst keeping some lighter. However, I felt that the layer I worked on was too dark so I changed the opacity of it and make the outlines more visible. I also feel that this made the image less overwhelming and more aesthetically pleasing. I also used a reference for the shading and made sure I had different references of different angles that the light source was coming from so that I could experiment with different places for shade.


I repeated the process on each illustration until I was satisfied with the results that I got. I feel that these illustrations have allowed me to decide on where I want the shading and tone to be on my images when I draw them for my book as well as giving me the chance to experiment more with the different types of brushes on photoshop in order to create different effects.


Working With Tone

Below are some basic illustrations that I have worked into in photoshop in order to add a variety of tones and textures. I used shading in different places on each illustration to experiment with what the shadows would look like when the light source was in different places as well as a mix or darker and lighter shades to build up where the darkest shadows in each image would be.


Thursday 3 December 2015

Typography - Creating My Own Font 3


For my final typeface, I wanted something bold that would stand out. I chose to use a thick marker pen when creating the letters to create a contrast with this font and the other two I created. I used both thick and thin lines so that there was a variation in weight and a clear transition between thick and thin. 

Once I drew out the letters and scanned them into photoshop, I used threshold to make the letters pure black and to sharpen some of the edges so that it looked crisper and more legible. I placed each letter on the template along with each number and punctuation.


Once I had placed everything on the template, I imported it into myscriptfont.com and turned it into a typeface that can be used. I like that there is a clear transition between weights and that it is legible. However, some letters aren't as legible as others and it may be hard for younger children to read the font.